What is the Tarantula Prusa 3D Printer
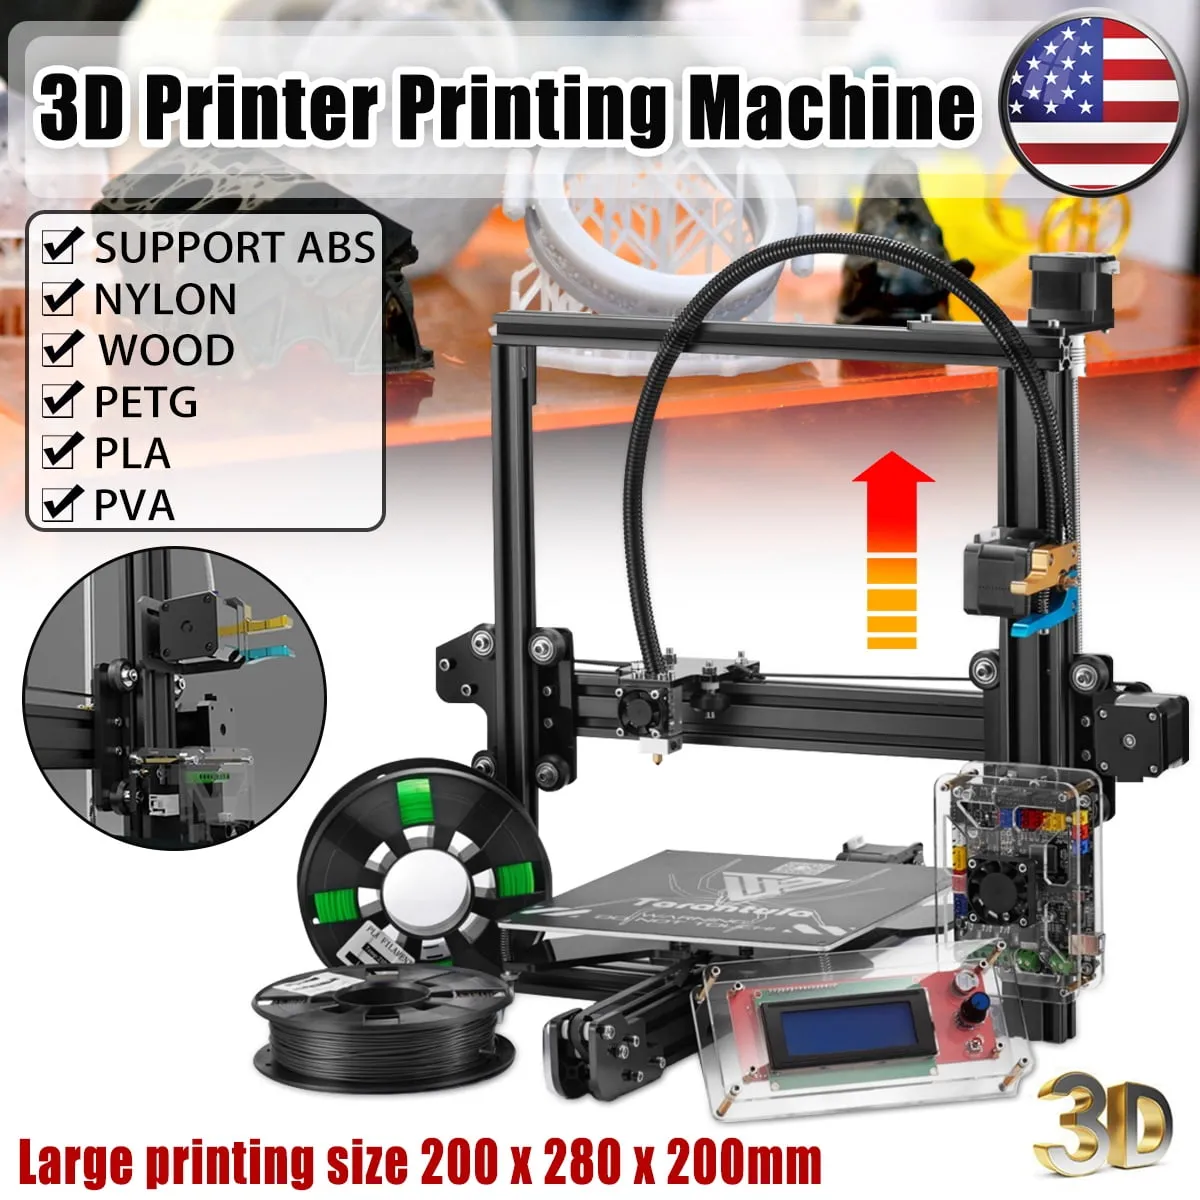
The Tarantula Prusa is a popular DIY 3D printer based on the open-source Prusa i3 design. It’s known for its affordability and ease of assembly, making it a favorite among hobbyists and beginners. The printer uses Fused Deposition Modeling (FDM) technology, which involves melting plastic filament and extruding it layer by layer to create three-dimensional objects. The Tarantula Prusa offers a great entry point into the world of 3D printing, allowing users to learn the intricacies of the technology while building and operating their own machine. Because it is an open source design, there is a large community of users creating upgrades and providing support.
Features and Specifications of the Tarantula Prusa
The Tarantula Prusa boasts several key features that contribute to its popularity. These include a heated bed, which helps prevent warping of prints by maintaining a consistent temperature, and a Bowden-style extruder, where the extruder motor is mounted on the frame and pushes filament through a PTFE tube to the hot end. The printer’s build volume is typically around 220 x 220 x 240 mm, providing ample space for printing various objects. It usually supports a variety of filament types, including PLA, ABS, PETG, and TPU. The Tarantula Prusa often comes with an LCD screen and a control knob for easy operation, and the frame is usually constructed from either aluminum profiles or acrylic, adding to the printer’s stability and durability.
Assembly of the Tarantula Prusa
Tools and materials needed
Assembling a Tarantula Prusa requires several tools and materials. You’ll need a set of Allen wrenches (hex keys), a screwdriver set, wire cutters, and pliers. A digital caliper is highly recommended for accurate measurements and adjustments. The printer kit usually includes all necessary components, but it’s always a good idea to have some extra zip ties, electrical tape, and a glue stick for bed adhesion. Having a clean, well-lit workspace is also crucial for a smooth assembly process. Make sure to have all the parts organized and easy to access. It is a good practice to check each part against the provided bill of materials.
Step-by-step assembly guide
The assembly of a Tarantula Prusa can be broken down into several key steps, starting with the frame construction. Follow the instructions carefully, ensuring that all screws are tightened securely. Next, assemble the heated bed and install the linear rails and bearings for smooth movement. Then, attach the extruder assembly and connect the hot end to the Bowden tube. Wire the electronics, including the stepper motors, endstops, and the heated bed to the control board. After that, mount the control box and connect the LCD screen. Finally, perform a thorough check of all connections and wires before powering on the printer.
Calibration and Initial Setup for Printing
Bed leveling and nozzle calibration
Proper bed leveling is critical for successful 3D printing. Start by manually leveling the bed using the adjustment screws at each corner. Ensure that the nozzle is a consistent distance from the bed across the entire printing surface. Then, use the auto-leveling feature if your printer has one, following the instructions in the manual. After leveling, calibrate the nozzle height by adjusting the Z-offset, which determines the distance between the nozzle and the bed during the first layer. Fine-tune this setting until the first layer adheres smoothly to the bed without being too squished or too far apart.
Setting up the printer in your slicer software
Slicer software, such as Cura or PrusaSlicer, translates 3D models into instructions that the printer can understand. First, you need to install the slicer software and add a profile for your Tarantula Prusa, which defines printer dimensions, nozzle size, and other settings. Then, import your 3D model and adjust the print settings, including layer height, infill density, and print speed. Before printing, generate the G-code, which is the set of instructions for your printer. This G-code is then saved to an SD card and transferred to the printer. Test prints are key to optimizing the settings for the printer and the type of filament.
Choosing the Right Filament for Your Prints
Types of filaments suitable for Prusa i3
The Tarantula Prusa can handle a variety of filament types, each with its own properties. PLA (Polylactic Acid) is a popular choice for beginners due to its ease of printing and low odor. ABS (Acrylonitrile Butadiene Styrene) is more durable and temperature-resistant, making it suitable for functional parts, but it requires a heated bed and can produce fumes. PETG (Polyethylene Terephthalate Glycol) offers a balance between ease of use and durability. TPU (Thermoplastic Polyurethane) is flexible and can be used for creating rubber-like objects. Consider the mechanical properties and the intended use of your printed object when selecting a filament.
Best filament brands and properties
Several filament brands offer high-quality materials suitable for the Tarantula Prusa. Hatchbox is known for its consistent quality and wide range of colors, making it a reliable choice for both PLA and ABS. eSun provides a good balance of price and performance, with a variety of specialty filaments, including PETG and carbon fiber-filled options. Inland is a budget-friendly option available through Micro Center, offering decent quality for the price. When choosing a filament, consider factors such as the diameter consistency, color accuracy, and material properties that align with your print requirements.
Slicing Settings for Optimal Prints
Print speed and temperature settings
Print speed and temperature are critical for print quality. Print speed affects the time it takes to complete a print and can influence surface finish and dimensional accuracy. For PLA, a print speed of 40-60 mm/s is usually a good starting point, while ABS might require a slower speed of 30-50 mm/s. The hot end temperature affects the filament’s melting and extrusion. PLA usually prints well at 190-220°C, while ABS requires a higher temperature, around 230-250°C. Fine-tuning the print speed and temperature is important for achieving the best results.
Support structure and infill settings
Support structures are essential for printing models with overhangs and complex geometries. They provide temporary support for the overhanging parts, preventing them from collapsing during printing. Infill settings determine the internal structure of the printed object, affecting its strength, weight, and print time. Infill density can range from 0% (completely hollow) to 100% (solid). Common infill patterns include grid, triangle, and honeycomb. Experiment with different support structures and infill settings to optimize your prints for strength, material usage, and printing time. The choice depends on the design of the object and the material used.
Troubleshooting Common 3D Printing Issues
Warping and adhesion problems
Warping occurs when the corners or edges of the printed object lift off the bed. This is usually caused by the material cooling unevenly and shrinking. To prevent warping, ensure that the bed is properly leveled and that the bed temperature is appropriate for the filament being used. Using a brim or raft can increase the contact area between the print and the bed. Applying an adhesive to the bed, such as glue stick or painter’s tape, can also improve adhesion. Enclosing the printer can also help to maintain a consistent temperature around the printed object.
Stringing and under-extrusion issues
Stringing occurs when thin strands of filament appear between the printed parts. This is usually caused by the nozzle extruding filament while moving between sections. To fix stringing, adjust the retraction settings in your slicer, increasing the retraction distance and speed. Under-extrusion happens when the printer doesn’t extrude enough filament, resulting in gaps in the layers. This can be caused by a clogged nozzle, incorrect temperature, or an issue with the extruder. Check the nozzle for clogs and ensure that the temperature is appropriate for the filament. Ensure your extruder is calibrated correctly.
Maintenance and Upgrades for your Tarantula Prusa
Regular maintenance schedule
Regular maintenance is essential for keeping your Tarantula Prusa running smoothly. Clean the print bed before each print to remove debris. Check and tighten the belts to maintain proper tension. Lubricate the linear bearings and rods with grease or oil periodically. Inspect the nozzle for clogs and clean it as needed. Check all screws and connections for tightness. Monitor the condition of the Bowden tube and replace it if it shows signs of wear. A consistent maintenance routine can extend the life of your printer and enhance print quality.
Recommended upgrades for improved performance
Upgrading your Tarantula Prusa can significantly improve its performance. Consider upgrading the hot end to a more efficient model for better temperature control. Installing a glass or PEI print bed surface can improve bed adhesion and print quality. Adding a BLTouch sensor or similar auto-leveling system can automate bed leveling, which enhances print quality. Upgrading the control board to a more advanced one, such as an SKR board, can enable features like TMC drivers for quieter operation and more precise control. These upgrades can provide significant improvements and expand the printer’s capabilities.
In conclusion, the Tarantula Prusa is a versatile and accessible 3D printer that is a great choice for beginners and hobbyists. By understanding its features, assembly process, and the key aspects of calibration, filament selection, and slicing settings, you can get great results. Regular maintenance and strategic upgrades will keep your printer running smoothly for years to come. Enjoy the exciting world of 3D printing!
